Wholesale Division - Min Order $250


Toll FREE 877-264-8532

|
ONLINE STORE
Category Search
General Search
|
Camp Crafts Guide
10 - Basic Leather Stamping Step One: WET THE LEATHER Dampen leather with WATER using a SPONGE or SPRAY BOTTLE. Note: The leather should be moist, not soggy. Apply the water as evenly as possible. When the leather begins to return to its natural color, begin stamping. If your leather dries out before you complete your stamping design, it will be necessary to moisten the leather again. Be sure to wet the entire piece to avoid water spots. You should get a golden brown color with your stamp impressions when the leather is moistened correctly as described above. Step Two: STAMP BORDER
Begin stamping by holding the tool upright and striking the end of the tool with your mallet. Place
your leather project on a sturdy surface. Always hold the tool close to the design end (bottom) to avoid
hitting your hand with the mallet. Practice on some other piece of leather before stamping your project.
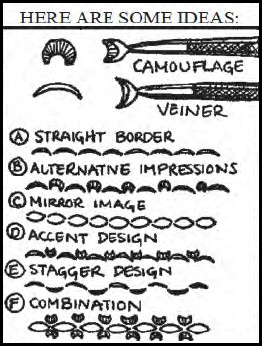
Your stamping tools can be used in many combinations. Symmetrical border designs will make your projects
look the best. Experiment with your tools to make over 50 different geometric patterns. Tilt your tool
for even more different looking impressions. Step Three: APPLY FINISH / COLOR Leather finish protects the leather and preserves the crisp appearance of the stamped impressions. All stamping of your designs must be complete before any finish is applied. Be sure the leather surface is clean, and free of dirt or dust. Leather finish must be applied before assembly or stitching. Apply sheen finish with a damp sponge, soft cloth, or wool dauber, in a smooth, circular motion. Be sure to cover the entire surface. Apply once over and let dry. Do not go back over the finished surface until the first coat is completely dry. Projects may be buffed for extra shine. Color may be added by using metallic paint pens, Sharpie-type markers, or acrylic paints. Add color carefully to your border and/or main design areas. Step Four: ASSEMBLY Punch holes, add snaps, etc., before lacing or stitching your project together.
|
Copyright © Beck Leather and Crafts
Site by Advantage Tech Resources
For technical questions about this site, please email